Understanding Chunking
What is chunking?
Chunking in Unreal Engine refers to the process of dividing your game's assets into smaller, more manageable "chunks" or packages. These chunks are essentially collections of assets that are grouped together based on certain criteria, such as their usage in specific levels or game modes. Chunking is especially useful for optimizing game performance and delivery, as it allows you to load and manage assets more efficiently.
In the context of Google Play Asset Delivery, chunking is crucial because it enables the dynamic delivery of assets, ensuring that players only download the necessary content when they need it, rather than everything at once. This can significantly reduce initial download sizes, improving the overall user experience as well as enabling you to control which assets are downloaded onto the device, for example, only if they make specific purchases or unlock certain achievements.
How can I specify which assets belong to which chunk?
This plugin uses Unreal Engine's chunking system to Chunk the assets, so all features Unreal Engine offers related to Chunking are automatically available to this plugin. In Unreal Engine, you can specify which assets belong to which chunk by using asset management tags and settings within the Unreal Editor.
You can read more about what chunking features Unreal Engine has by reading through their Official Documentation. To give a brief overview of what is covered in their documentation, here are some of the methods you can use:
Primary Asset Labels
You can create a Primary Asset Label per chunk allowing you to manage assets within that Chunk easily from one place.
Simply right click anywhere in your Content Browser to bring up the below menu. Select Miscellaneous and Data Asset.
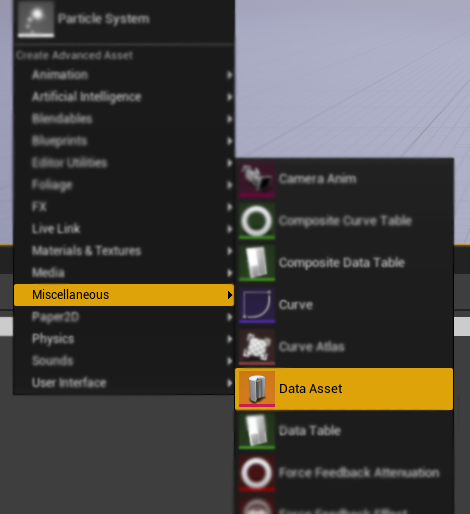
You will then be promted to pick what Data Asset Class to use. Select PrimaryAssetLabel and then Click Select.

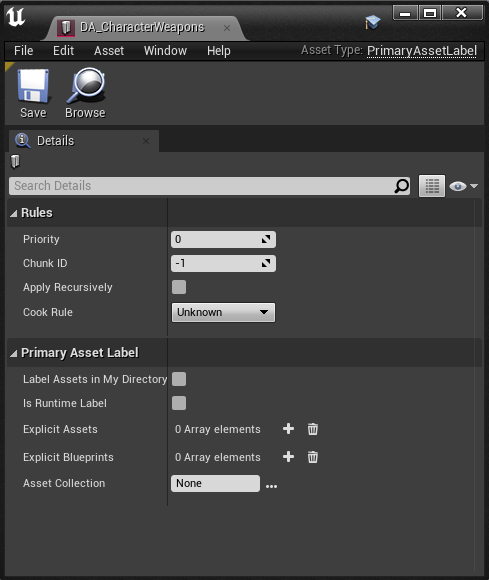
Name your DataAsset you have just created and double click it to open it up.
Here you can choose which Chunk this will group its assets into and which Assets or Blueprints to include in that Chunk. There are some useful features here as well, such as "Label Assets in My Directory" which can automatically add all assets in the same directory as this Data Asset object to the desired Chunk.
Individual Asset Labels
You can also label assets on an adhoc-basis to specific chunks.
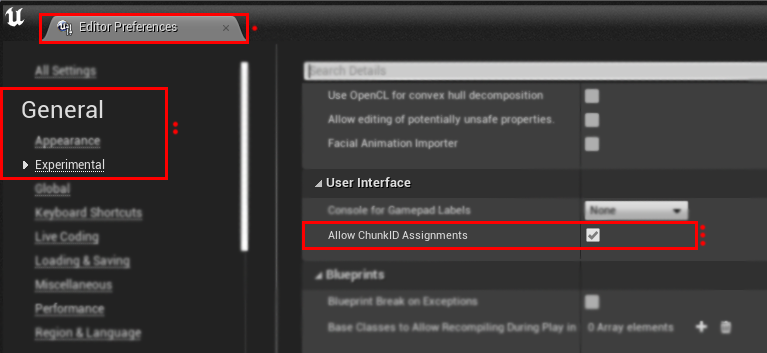
Click "Edit" at the top of the Unreal Engine Editor and open up "Editor Preferences".
From here Navigate to "General", "Experimental" and go to the "User Interface" section. Enable "Allow ChunkID Assignments".
NOTE: Editor preferences are not always saved by default, so if this is your chosen method, be aware you may have to renable this on each project launch.
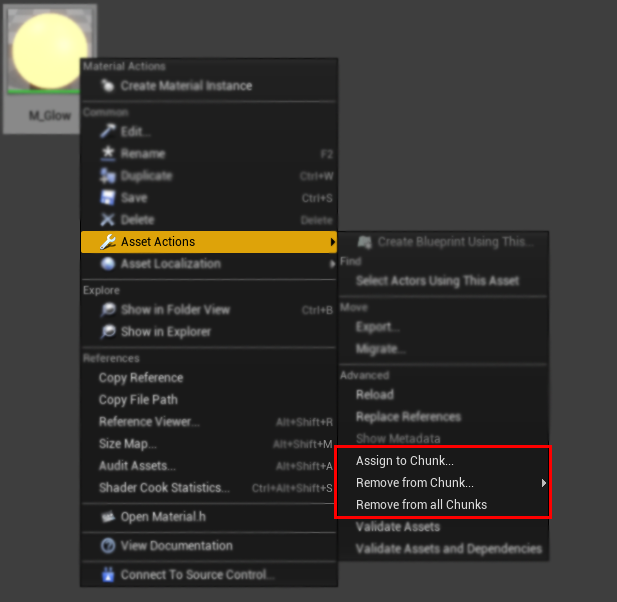
Now you can right click any asset and navigate to "Asset Actions" and you will have the ability to assign and remove this asset from chunks.
I would discourage use of this method as its difficult to keep track of what assets belong to which chunks.
There are more methods in how to make use of Chunking in Unreal Engine and I would encourage you to read Unreal Engine's Official Documentation to choose the most appropriate method for you.
What is the end result?
The end result in terms of Android development, is that all chunks (excluding chunk 0) produce a PAK file each, which is Unreal Engine's chosen storage method for grouping assets together.
In the context of Google Play Asset delivery and this plugin, each Chunk will automatically create an appropriate asset pack, all you need to do is remember which chunk relates to which asset-pack you would like to fetch and install at runtime.
- Chunk 0 is automatically assigned as an install-time asset pack
- Chunk 1 is automatically assigned as a fast-follow asset pack
- Chunk 2 and above are automatically assigned as on-demand asset packs
NOTE: Chunk 0 / install-time assets are automatically downloaded and available immediately as per normal and you do not need to assign assets to Chunk 0 specifically.
This does not impact how you upload your aab file to the Google Play Store, simply upload your aab file as usual and all asset packs will be included.
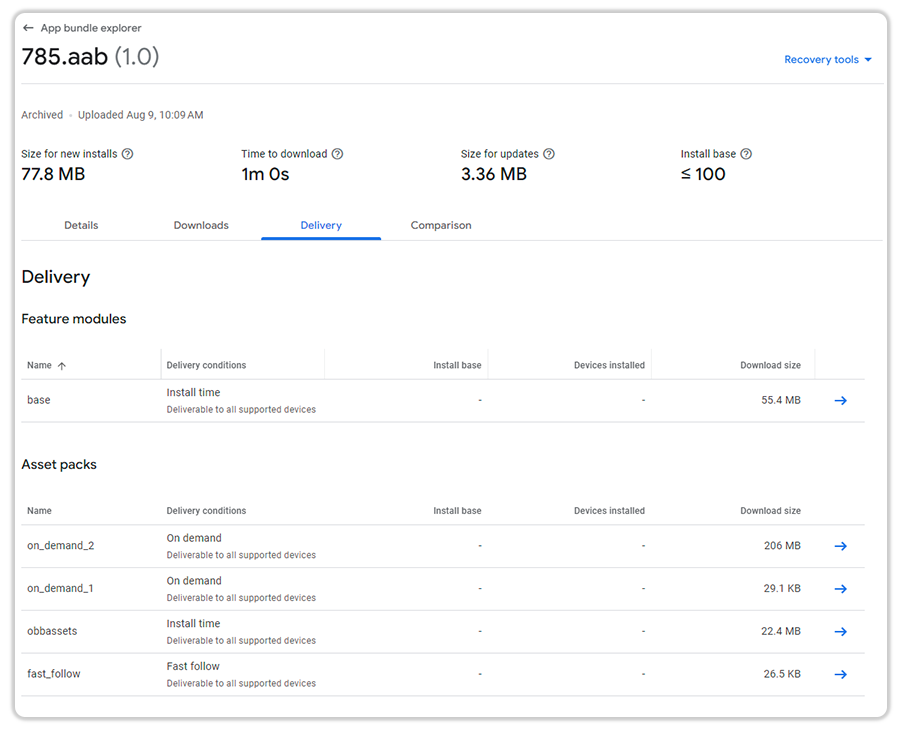
When uploaded to the Google Play Store, you can navigate to your App Bundle Explorer for that version and see your asset pack details there. In the below example, we have three chunks (Chunk 1, Chunk 2 and Chunk 3).
How does the plugin use my chunks?
The existing Unreal Engine Google PAD plugin required a lot of manual intervention to work, which included you do the following for every time you want to deploy/test:
Package your application, find your PAK files, create each asset pack directory structure, create your gradle files for each asset pack, copy over the PAK files into this directory, package your application a second time.
I am very proud to say this plugin automates this entire process for you and also does not require you to package your application twice, saving you valuable time.
When packaging your application, you can see what the plugin is doing in the Package Log Output. The below example is the result of packaging a project with four Chunks defined:

NOTE:
You can create a total of 50 asset packs per application. You can only have one install-time and one fast-follow asset pack per project, but can use as many on-demand asset packs as you want as long as you do not exceed this limit.